You can always send us your messages, comments or suggestions.
In one click, store and find all your favourite recipes.
Add this recipe >Before starting this Strawberry & Coconut Entremets recipe, organise the necessary ingredients for the white mirror icing.
Hydrate the gelatine with 140 grams of water at room temperature.
Combine with a spatula and set the gelatine aside until completely rehydrated.
Pour 125 grams of water in a saucepan to make the syrup.
Add the castor sugar...
... and the glucose syrup, melted in the microwave for a few seconds beforehand.
Bring to a boil. When the sugar reaches 103°C (use a laser thermometer to monitor the temperature)...
... take the saucepan away from the heat and add the unsweetened condensed milk.
Combine with a rubber spatula.
Add the rehydrated gelatine and combine until completely dissolved.
Pour the hot preparation over the white chocolate pistoles.
Start stirring to melt the chocolate and add the white colouring powder. The amount of colouring varies, depending on the desired colour intensity you wish to achieve.
Scrape out the seeds from the vanilla pods and add them to the preparation. Mix with a hand blender. The white colour will fully reveal itself once the titanium dioxide is completely dissolved. Set aside.
For the coconut streusel crust: Organise all the necessary ingredients.
Tip all the ingredients in the stand mixer bowl.
Process with the flat beater...
... until the consistency is crumbly and homogeneous.
Spread into an even layer, to a thickness of 0.5cm, in a stainless steel tart ring (Ø 18cm) placed on a Silpat baking mat.
Press the surface with the back of a spoon to make it compact.
Bake at 150°C (gas 2) for 45 minutes, preferably in a fan-assisted oven.
When cooked, remove from the oven and remove the tart ring.
Drizzle the surface of the hot streusel with Mycryo cocoa butter in order to make it resistant to moisture. Reserve.
For the coconut madeleine biscuit: Organise all the necessary ingredients.
In the stand mixer bowl, place the whole eggs, castor sugar and invert sugar (also called trimoline). You can replace invert sugar with honey.
Place the recipient in the stand mixer...
... and mix at high speed...
... for a few minutes, until the preparation is pale and fluffy.
Add the flour and baking powder (sifted together).
Gently fold with a rubber spatula.
To facilitate the incorporation...
... combine the melted butter with a little amount of preparation beforehand...
... then pour the mixture over the remaining batter.
Pour the grated coconut into a thin stream...
... and combine gently.
On a Silichef baking sheet, place a Silpat baking mat and a stainless steel tart ring (Ø 18cm) on top. Pour the preparation in the ring...
... and bake at 170°C (gas 3) for 12 minutes. When cooked, remove from the oven and leave to cool.
For the strawberry jelly insert: Organise all the necessary ingredients.
Hydrate the gelatine with 30 grams of water. Set aside until completely rehydrated.
Pour the strawberry purée in a saucepan.
Add the invert sugar (or trimoline).
Heat the preparation while stirring with a whisk.
In a separate bowl, combine the pectin NH and castor sugar.
Add these two ingredients to the simmering strawberry purée. Important: the pectin and castor sugar should be combined together before adding to the fruit purée to avoid any lumps.
Combine well with a whisk and cook for about 2 or 3 minutes.
Stretch some cling film on one side of a tart ring (Ø 16cm) to create a bottom. Make sure the film is stretched tight.
Add the lemon juice to the strawberry purée...
... and the rehydrated gelatine.
Combine with a whisk until the gelatine has dissolved completely in the hot purée.
Finish mixing with the hand blender for a smooth preparation.
Pour the purée into the ring lined with cling film, to a thickness of about 0.5cm. The side with cling film should be facing down. Let set in the freezer.
For the vanilla crémeux: You will need to make a crème anglaise with the ingredients. Cook the custard 'à la nappe' (i.e. until the consistency is thick enough to coat the back of a spoon).
Soften the gelatine sheets in water then strain. Add to the hot cream.
Whisk until the gelatine has dissolved completely in the hot purée.
Add a few drops of Tahitian vanilla extract. Blend.
Pass the cream through a fine sieve and transfer into a large baking sheet with raised edges. This is essential to get rid of any lumps that might have appeared while cooking and to ensure the preparation cools down faster. Do not refrigerate. Leave to cool at room temperature.
When frozen, remove the strawberry jelly from the freezer.
Pour the cold crème anglaise (it shouldn't be jellified) over the frozen strawberry insert.
Return to the freezer and leave to set for a few hours.
For the strawberry mousse: Organise all the necessary ingredients.
Soak the gelatine sheets in cold water.
Pour the strawberry purée in a saucepan and place on the heat.
Strain the gelatine by squeezing in your hand to extract as much water as possible.
Add the gelatine to the hot strawberry purée.
Combine until completely dissolved.
Transfer the strawberry purée into a large baking sheet with raised edges so it cools down faster.
In a saucepan, tip the castor sugar and water.
Cook the sugar until the temperature reaches 118°C. For this step, the use of a digital thermometer is recommended.
When the sugar has almost reached the desired temperature, start beating the egg whites until firm.
Gradually add the cooked sugar to the beaten egg whites, pouring it against the inner side of the bowl.
Beat until cooled down completely.
Combine the meringue with the whipped cream...
... and add the strawberry purée. Combine gently.
Assembling the cake: Place a mousse ring (Ø 20cm) on a baking sheet.
Stretch some cling film on one side to create a bottom. Make sure the film is stretched tight.
The side with cling film should be facing down.
The layers we're assembling here are reversed.
Start with a layer of strawberry mousse at the bottom of the ring. I recommend using a piping bag for this operation.
Release the strawberry jelly and vanilla crémeux insert from the tart ring...
... and place it on top of the mousse. The side with vanilla crémeux should be facing up.
Arrange it in the centre and bury it gently in the mousse.
Pipe a second layer of strawberry mousse.
Place the coconut madeleine biscuit in the centre...
... and press firmly to bury it in the mousse. The strawberry mousse should come up on the sides of the biscuit.
Using a brush, apply the syrup on the surface of the biscuit.
Cover the biscuit with the rest of the strawberry mousse.
Gently lift the coconut streusel...
... and arrange it on the top of the strawberry mousse. The coconut streusel is the last layer, which means it will be the base of the finished cake.
Due to its crumbly texture, the streusel is very fragile. If you break it while lifting it, it is not a problem. You'll simply need to rearrange the pieces into the initial disc shape.
Store in the freezer for at least 4 hours.
Up to this stage, this recipe can be prepared in advance and stored in the freezer. On the day, you will need to do to follow the steps below.
Icing the cake: Remove the cake from the freezer and the icing from the fridge.
Transfer the cake onto a cooling rack, which has been placed on a deep tray. To remove the ring, heat the sides with a blow torch...
... then gently slide it upwards. Reserve in the freezer.
Mix the white icing with the hand blender for a smoother consistency without air bubbles. The ideal temperature to work with the icing is between 27 and 30°C. If needed, slightly reheat it.
Take the cake out of the freezer, and pour the icing in one stroke...
... starting from the centre...
... and let the excess drip off along the sides. Make sure the whole surface of the cake is coated.
Gently tap the rack on your worktop.
Store in the fridge and leave the icing to set.
For the finish: Remove the cake from the fridge.
Transfer the cake onto a serving dish...
... lifting it with 2 cranked spatulas. Gently arrange the cake in the centre of the dish.
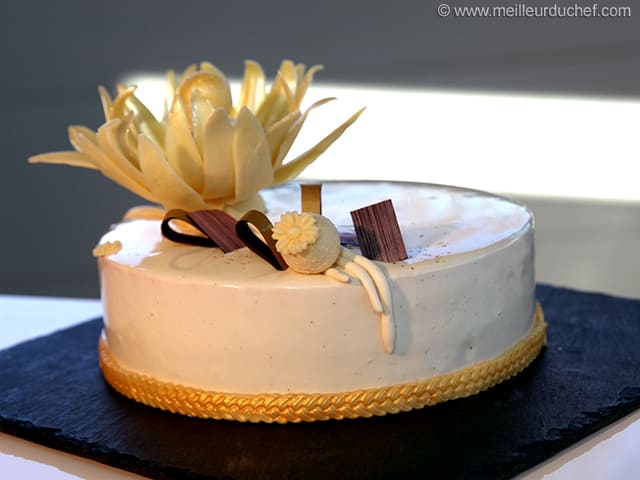
To decorate the entremets, Cécile made a variety of ornaments using tempered chocolate or chocolate modelling paste.
Arrange a chocolate plaited lace all around the base of the cake. This is made from ivory chocolate modelling paste, then brushed with gold colouring powder.
Of course, these decorations are only shown as an example. Possibilities are endless, just follow your imagination!
Please login to post a review